This time last year, as mentioned in my March 2023 update, I was participating in my first- and admittedly only- air-to-air photography shoot, flying out of RAF Wittering. I had done a little research beforehand to give myself some tips, but the flight itself was a steep learning curve, including some things which the internet hadn’t forewarned me of.
Most of the articles I had read seemed to assume ‘ideal’ air-to-air circumstances: a sortie designed for photography, with one or more subject aircraft chasing the photographer’s aircraft, and that notably having a high wing configuration and openable windows. As the formation I was in had been designed mainly as a tail chase exercise, I didn’t have the stability one would hope for- and as all of the aircraft concerned, including mine, were Grob Tutors, a high wing and openable windows were not benefits that I enjoyed!
Even before the flight started, I had some restricting factors to take account of. To prevent loose articles in the cockpit, I would only be taking my camera body and the attached lens, with no changes available. After much deliberation, I opted for my 50-230 lens, and added the hood as a replacement for the lens cap, which would be secured in my pocket before I strapped in and not put on and taken off between shots. The camera itself being a look article was avoided by wearing my wrist strap as usual. I also set my camera’s view mode to display only on the LCD back screen, not in the eyepiece, as I would be wearing a helmet, and unable to bring the camera up to my eye to line up shots. This was another element of challenge, and also of stepping outside my comfort zone, as I often find it easier to use the eyepiece when composing a shot, but it worked out fairly well.
As with any formation flight, our plan was briefed in detail beforehand to all pilots and crew members en masse. We were told routes, heights, separation distances, and the plan for the aerobatics sequences, as well as deconfliction procedures and other safety measures. That concluded, we kitted up and headed out to the aircraft, and the sortie really began.
Whilst we were taxiing to the end of the runway, I had my first scare. It was drizzling lightly, not enough to be a problem as we would climb above it, but with small enough droplets to remain on the canopy despite the propwash. My camera couldn’t focus through it! I tried manual and automatic settings, and given that both myself and the subjects were constantly moving, neither brought any joy.

Thankfully, though, as soon as we increased to flying speed, the airflow was more than enough to clear it away, and I got my first little taste of success whilst we were still over the runway (left). There is a little prop blur, some of the dashboard creeping into the bottom left corner, and the colours leave a lot to be desired, but it was a start which I finally felt encouraged by, and my fears of every image being blurred were blown away along with the water droplets in the slipstream.
Take-off had been in ‘stream’, with each aircraft rolling shortly after the one before but not at the same time, and with my aircraft at the back, I got a few shots of the other aircraft during the climb above the cloud base. Once we were all airborne and our checks done, we entered formation proper, a vic with myself in the outside left position. My second scare occurred: the formation was very close, and the long lens was really too long to capture both of the other aircraft at the same time. Individual shots were good, particularly against the thinning cloud layer and a rainbow which happened to appear, but how to get both in one shot, with a lens change not available?
My answer was to use my phone. I only took a couple of shots, as the time used to get it out, get my gloves off, take the pictures, and then reverse the process, all with a camera attached to my arm, was flight time being wasted, but it worked quite well. I knew at the time that they wouldn’t be of a deliverable standard- look at the reflections in the canopy- but it was a good enough stop-gap. I was just hoping that we wouldn’t spend a great deal of the sortie in that formation.
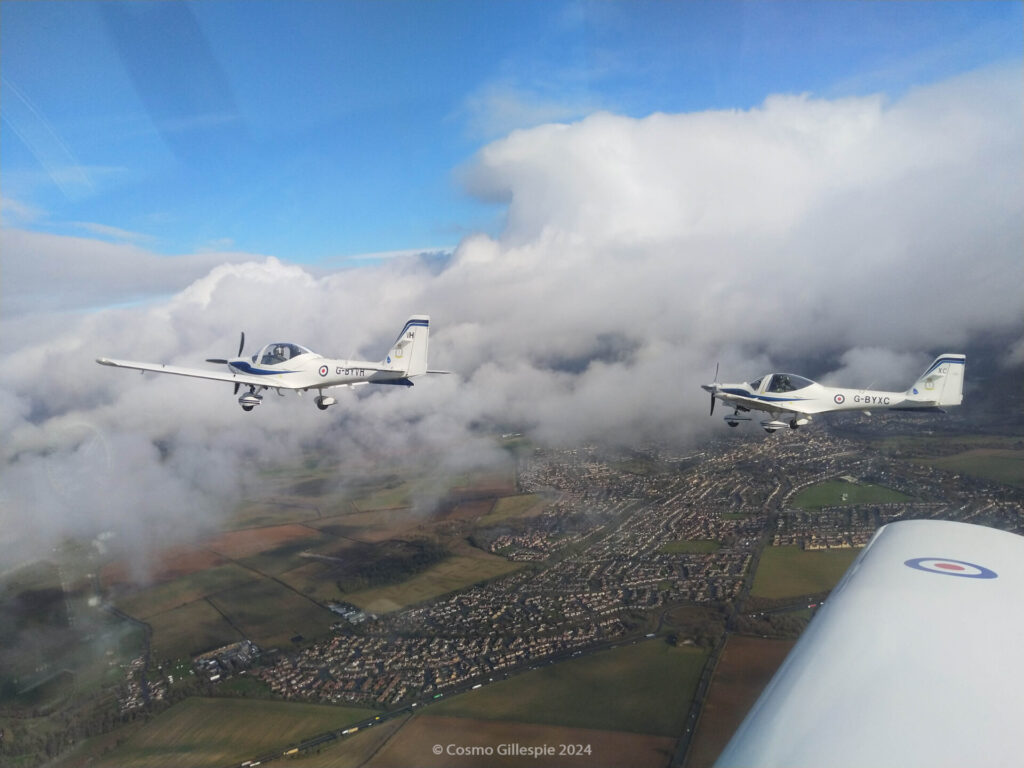
As a note, in the side-by-side seating configuration of the two-seater, I was in the right, and there was hardly an option to switch! This was a greatly limiting factor, but one which I did manage to work with quite well. I found, naturally, that I got the best pictures of the other aircraft when they were to the right of me, particularly when positioned abreast or behind. These also best captured the left-seat occupant, with the other often blocked by the canopy arch.
However, as much as I wished for a short lens whilst we were flying close together at the beginning, I was glad of a long lens for everything else in the sortie. As we settled into the flight and stretched a little prior to the start of the tail chase, we did a series of wide turns over the countryside local to Wittering, including over Rutland Water. It was here that I got the photo I regard as the best from this sortie: G-BYVH banking with the lake in the background. Although it is over a year old, it remains as my laptop’s lock screen to this day- and until I have something better to replace it, it’s not going anywhere!

Soon after, we entered a line astern formation, and as I found myself at the back, I was forced to shoot forwards, through the propeller. Finding that almost all of my shots were marred by either blur or interrupting lines, I played around a little with the exposure, but didn’t have the knowledge at that time to work out a best balance. I was also rushing a little, as we weren’t due to stay like that in straight and level flight for very long, and these factors combined to get a few ‘ruined’ shots.
Below left: Severe overexposure, despite having lowered the shutter speed, aperture, and ISO. That’s what a bright blue sky at midday will do! 1/250s, f/22, ISO 1250, unedited. Below right: A little better, with the sun at a different angle, but still not acceptable, particularly with all the marks in the top right. A shame, as the composition is otherwise quite good. 1/250s, f/22, ISO 1250, unedited.


I found throughout my experimentation, and indeed throughout the whole rest of the sortie, that autofocus was very reliable, even when shooting forwards. The time to focus was quicker when the lens was closer to the canopy, but it almost always got there in the end, only really failing when the subject moved dramatically out of place or my aircraft jolted unexpectedly.
Once I settled into how things worked, I was able to think more creatively than technically, mainly making the most of the variety of backgrounds presented to me, between sky, clouds, ground, or a mixture thereof. I found that the photos with ground as the background were the most satisfying to me, as they couldn’t possibly have been taken anywhere but the air. Particularly the photos below are favourites of mine, because they have no sky at all! The one on the right is almost in the ‘Squadron Prints’ style, and I’m very happy with how both the aircraft and the background are in focus.


Many of the photos from this sortie were portraits of the crews of the other aircraft, which I am not sharing to protect their privacy, but the best way to get them was to shoot backwards over my right shoulder, when their aircraft were between the four and five o’clock positions from my own. When going backwards for these shots, I found it necessary to lift the clear visor of my helmet temporarily, so that I could see the camera screen clearly, and also noted that with fewer back cushions, movement would have been easier. For the portraits and other shots when my aircraft was leading the formation, there was quite a bit of twisting in place, and this was particularly hard when I went behind the pilot for the occasional shot to the left. Although the cockpit can sometimes feel roomy in normal flying, during that sortie it did not!
The best portraits were taken when the three aircraft were in a right echelon, with my own in the lead, and I could look over my right shoulder and capture both of the others, with the rearmost aircraft appearing slightly above the middle aircraft. All four crew members were visible, and even all looking at me for a few of the shots, and it was very special to be able to present them with those photos a few days later. Great memories for all!
When writing some reflective notes after the sortie, a few things came to mind which would have improved the experience, and the end product, apart from the factors mentioned at the beginning (high wing and openable windows). Although the lens hood which I decided to put on was good at removing internal reflections to an extent, it was not perfect. I have seen from a couple of sources that a piece of black card around the end of the lens does a lot more to limit the reflections, and as it seems inexpensive to try, I’ll keep the idea in reserve. There are also specialist products that do the same thing, and probably better, but I’m working on a pretty low budget.
I noticed that the wearing of olive green flying suits did a lot to reduce reflections on the canopy when not in direct sunlight, which was a real help, but brightly coloured patches were very obvious in reflections. In the subject aircraft, it wasn’t a problem, but in my own, I was wearing a red patch on my right arm, and occasionally caught a glimpse of it in the photos. It didn’t ruin a great portion of the shots, but the one or two where I noticed it made me annoyed at having made the very avoidable error.
Overall, a great experience, which I’m very happy to have had so early in my photography career. I can’t wait for the next opportunity, to try and improve my skills and refine approaches and techniques I identified this time. The only way from here is up!